Anyone who has purchased our patterns has probably noticed that we don’t do much when it comes to borders. Most are narrow and, in some cases, non-existent. There is a reason for that.
Our emphasis is on the central figure(s). Many purchasers already have a finished size in mind and it is usually larger than the finished size of our patterns. We suggest adding multiple borders of varying widths to increase the finished size. A single wider border may be all that is needed, but don’t hesitate to add more.
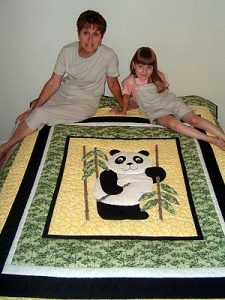
 This photo from one of our customers is a good example. She started with our Amanda Panda pattern and added borders until her quilt fit a twin size bed. Notice that the top and bottom borders are wider than the side borders. This is often necessary to increase the length and adds interest to the quilt.
If you wish to increase the finished size, first decide what that finished size will be. Graph paper, a pencil, an eraser and a ruler are helpful. Draw the size of the background of the pattern in the center and the proposed finished size around it. Start with a narrow border, followed by a wider one. This is a trial-and-error process, so keep at it until you are satisfied.
Once you completed your border design, decide on fabric colors. Note how the fabrics – black, white, gold and green – in the central design were repeated in the borders, tying it all together.
[csbshare]